
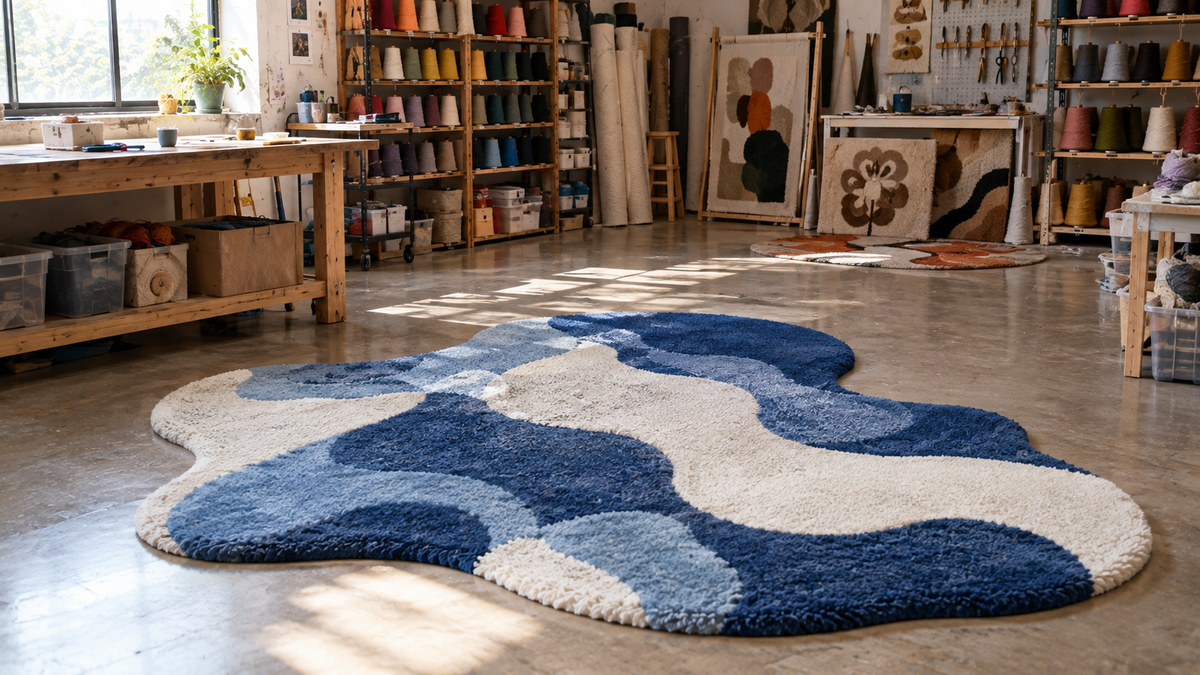
Not everything you tuft is a rectangle. A cloud, a leaf, a brand mark, a shape with no straight side anywhere.
Curves are the hard part by hand — turning the gun while keeping the spacing even takes practice, which is why beginners get told to stick to straight lines. A machine holds the line you drew, curve or not.
But what comes off the frame is the same thing either way: a sheet of cloth with a shape sitting in the middle of it. Cutting that shape out and finishing the edge is hand work, and that's what this guide covers.
For what else tufting can produce beyond rugs, see our guide to tufting beyond rugs.
1. Spot the shapes that cause trouble later
Some outlines are harder to finish than others, and you can see them coming while the design is still on screen.
- A thin neck joining two bigger areas. Think of a dumbbell, or a cloud with a pinch in the middle. That neck holds the whole piece once you've cut it out, and it's where things tear. Make it thicker, or split the design into two pieces and mount them apart.
- A long thin spike. A star point, an antenna, a tail. If the spike is narrower than the yarn filling it, it comes out floppy no matter how you finish the edge. Round it off.
- A deep notch cut inward. The gap between two cloud bumps, the inside of a V. Tight inward angles are the hardest place to fold cloth. Open the angle up now and save yourself the trouble later.
All three are cheaper to fix on screen than at the cutting mat — which is the theme of this whole guide.
2. Leave spare cloth around the shape
Your shape sits in the middle of a bigger sheet, and the bare cloth around it gets used twice: once to hold the glue, once as the fold that hides the raw edge. You can't add it after the cloth is cut, so leave it before you tuft.
Leave more wherever the outline curves. Folding a curved strip flat against the back eats more cloth than folding a straight one, and the tighter the curve, the more it eats. A shape with round bumps and deep inlets needs a wider margin than a smooth blob of the same size.
One more reason to keep the shape away from the edge of the sheet: cloth near the frame rails never pulls as tight as cloth in the middle.
3. Glue, cure, then cut it out
Glue goes on the back while the piece is still stretched on the frame. Work it down into the roots of the yarn rather than spreading it across the top — a putty knife for thick latex, a brush for something thinner.
Carry it 3–5 cm past the outline, out onto the bare cloth. That band is what your scissors will travel through. It stiffens the weave so the blade tracks a line instead of dragging threads with it, and it stops the cut edge unravelling later.
Then leave it a full day. A piece cut off the frame before the glue has cured curls as the cloth relaxes — and a curled shape stays curled. It won't fold flat afterwards, and the outline you drew is no longer the outline you have. Our rug finishing guide covers the glue stage in full.
Once it's cured, trim the pile along the outline before you cut anything. Yarn leaning over the line hides where the edge really is, and you'll cut into your own border. Then cut the shape out, staying wide of the line — 2–5 cm of cloth all the way round.
4. Back it before you touch the edge
Backing is a layer of cloth glued across the whole back. It covers the dried glue, adds weight, and gives the reverse a clean face. Do it before you deal with the edge — a backed piece is stiffer and much easier to handle while you work around the outline.
Cut it to the outline of your shape, a few millimetres inside the edge so it stays hidden from the front. On a rectangle you can lay it down and trim afterwards; on a shape it's easier to cut first — lay the piece face down on the backing fabric, trace round it, then cut inside your own line.
Leave the strip of bare cloth uncovered. That's the fold, and it needs to land on top of the backing rather than under it.
Spray adhesive on both faces and press from the centre outward. Which backing you choose depends on where the piece ends up: felt or cotton for a wall piece, felt-and-rubber non-slip for anything on a floor.
5. Fold the edge back
After cutting you should have a narrow strip of bare cloth around the shape. Don't cut this strip away — it becomes the edge that folds onto the back, covering the raw cut so the front keeps a clean yarn border.
Straight edges are simple. Curves need more care, because the cloth has to change shape as it folds.
- On an outward curve. A round bump creates surplus cloth on the outside of the curve, which bunches and wrinkles if you force it. Cut small V-shaped notches into the strip so it can close up as it folds.
- On an inward curve. The opposite problem: the cloth has too little room. Shape the fold by hand first, and if the curve is too tight, make a small relief cut toward the fold line.
- At a sharp point. Points stack up thickness when folded. Trim the excess near the tip, then fold each side down separately rather than layering both together.
Press the folded edge flat until the glue sets.
6. Carve the outline
Level the surface first. Run the trimmer flat across the whole piece to bring the pile to one height, the same as on any rug. The outline comes after — levelling would undo it if you worked the other way round.
Inside the piece, carving works as it always does: where two colours meet, tilt the blade to about 45 degrees and cut a V-shaped channel down toward the line. What reads as a sharp edge is the shadow sitting in that groove. Our guide to carving clean edges covers it properly.
The outline is different, because there's no second colour on the far side of the groove. There's the wall, or the floor. So instead of a channel you're cutting a single face: hold the blade at the same angle but work it around the rim, taking the pile back so it ends on a line rather than a fringe.
Go slowly on the tight parts. A wobble along a straight rug edge disappears into the length of it. A wobble on a small curve is the shape — and there's nothing beside it to read against.
What the machine does and doesn't do here
Worth being clear, because shaped work is where the division shows up most plainly.
The machine holds the outline. It tufts to the path in the file — the same curve, the same spacing, at the same density all the way round, whether the shape is a circle or a sixteen-petal flower. That's the part that takes practice by hand, and it's also what makes the cut line predictable enough to follow with scissors afterwards. If you're making the same shape more than once, every copy comes out on the same outline.
Everything after the last stitch is yours. Gluing, curing, cutting, backing, notching, folding, carving. None of it changes because a machine laid the yarn, and all of it is where a shaped piece is won or lost.
Which is why the design decisions in section 1 matter as much as they do. A clean outline tufted perfectly is still a difficult piece to finish if the shape has a thin neck in it. The machine will hold whatever line you give it — including a bad one.
Frequently asked questions
How much spare cloth should I leave around the outline?
Enough for the glue band and the fold: 3–5 cm past the outline for the glue, and 2–5 cm of cloth left on when you cut the shape out. More wherever the outline curves. It's the one thing you can't add after the cloth is cut.
Can the machine cut the shape for me?
No — cutting is hand work. What the machine does is tuft the form and hold the outline to the path you drew, which makes the cut line predictable enough to follow.
My cut edge started fraying. What went wrong?
The glue stopped at the yarn, so the blade cut into untreated cloth. Next time, run the glue out past the tufted area and cut inside that band. On the piece you have, work glue into the exposed weave and cover it with twill tape.
I cut it off the frame before the glue cured. Is it salvageable?
Partly. Yarn pulled from the border can be worked back in and glued from behind. What doesn't come back is the curl — the strip of cloth around the shape sets in whatever position it relaxed into, and a strip that curled won't fold flat against the back. You can still back the piece and bind the edge, but the fold will fight you.
How small can a shaped piece be?
Small is fine — a coaster-sized shape holds together once it's glued. What limits you is detail: a narrow spike or a tight inlet has to survive both the pile filling it and the fold going around it.
Do I need a different design file for a shaped piece?
No, just a different outline. The shape is simply the boundary the tufting stops at, and the surrounding cloth is left bare. What does change is the margin you plan around it, which is a decision made before tufting rather than after.
Share:
Beyond Rugs: Wall Art, Carved Relief and 3D Tufted Objects
Colour Tolerance in Craftphilia Studio: How to Make the Preview Match the Rug